Saturday 27 April 2019

WEEK 11 (FYP 2)


TITLE : EXHIBITION DAY


Activity: 

The Final Year Project presentation was conducted at Dewan Gemilang British Malaysian Institute at 8am to 2.00pm.

Content:


The figure above shows the profile of the assessor that will assess the student presentation. It should be two assessors, unfortunately, the second assessor is from the industry itself so the second assessor profile cannot be display. The figure below shows the activity takes place during the Industrial day.


Conclusion:

To conclude this week activity, the figure given is the proof that the presentation is already taking place successfully as the demonstration of the prototype are also gone through successfully.

Saturday 20 April 2019

WEEK 10 (FYP 2)

TITLE : POSTER PREPARATION


Activity:
Preparing the poster for presentation.


Content : 
In the poster, it has include :
-Title Project
-Name , ID and Course
-Supervisor Name
-Objective
-Project Description
-Methodology
-Flow Chart
-Result
-Conclusion
-References


Saturday 13 April 2019

WEEK 9 (FYP 2)


TITLE : CONSTRUCT MODEL

Activity:
In this week after the tehcnical ad software has been done and successful, its time to design the model of the project.

Objective:
  • To design the model/hardware of the project
  • To make a simple and small protoype
Content:

Before build the prototype with actual material, i decided to design the model of the product first. The final product has been sketch. The sktech are shown in figure below :


Design Sketch

After final design was sketch, its time to build the prototype with actual material. 


Conclusion :
The prototype has been built successful and look the same exactly like a sketch design. Now the project is ready to be present on exhibition day.


Saturday 6 April 2019

WEEK 8 (FYP 2)

TITLE : WRITING CODE


Activity:
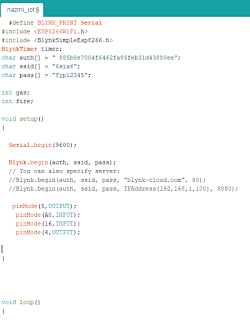
This week i will focus on the coding for Arduino IDE, the input and the output pin for the project, and the process of setting up the Blynk app. The parts that will be included are defining the pins of the input and output value. Coding when the input is high and the coding when the input is low. All the coding for the project were constructed one by one according to the step of the project runnin. All of the coding will be program in the arduino to be display as a complete code .


Objective:
  • To write the coding for nodemcu
  • To setting up the Blynk App
Content : 

Program Code

Picture above is shows the final program code for this projects. The codes has change time to time to get the code works on the project. 


The Blynk app also has been setting up. all the widget in blynk interface has been setup to the pin in nodemcu. the token also has been sent to email and has been write to the code in arduino ide. 


The coding has been test to the project. The coding was successful. Next progress is to design and construct the hardware of this project.